The very first thing about debugging that you need to know, is the break point. It actually does exactly what the name implies - it marks a point in your code where the execution will take a break (and no, it won't actually break your code, don't worry). Placing a breakpoints in Visual Studio or one of the Express versions, is as simple as left-clicking in the gutter, which is the grey are to the left of your code. Once you click it, you will get a shiny, red circle as a reward - this circle marks where the debugger will halt when you execute your application. You better have a look for your self, and to see the effect, we will use the following piece of code:
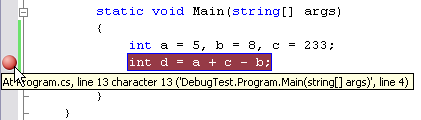
Now, can you predict the result just from looking at the code? Probably, and if not, you could just get out the old calculator and do the math, but that's not really the point. Just imagine the amount of code being much bigger, and let's debug the thing! Place a breakpoint by clicking in the left gutter - your IDE should now look something like this:
Okay, you're ready to start your first debugging session. As soon as you have placed the breakpoint, you can just run your application like you normally would - from the menu, the toolbar or by pressing F5. What happens now is that the application is executed just like normal, but as soon as a line with a breakpoint is reached, the execution is stopped right before that line would be executed. In this case, it means that the variables a, b and c will have a value, but d will only have it's default value (which is 0 for an integer), since it won't be set before the line with the breakpoint has been evaluated. Now, here comes the cool part - try hovering your mouse over the different variables - the IDE will tell you what they contain. As mentioned, the d variable will have it's default value, but let's change that, by moving forward in the execution. In the next chapter, I will show you how to navigate around your code, while it's being executed.
namespace DebugTest
{
    class Program
    {
        static void Main(string[] args)
        {
            int a = 5, b = 8, c = 233;
            int d = a + c - b;
            Console.WriteLine(d);
        }
    }
}
Now, can you predict the result just from looking at the code? Probably, and if not, you could just get out the old calculator and do the math, but that's not really the point. Just imagine the amount of code being much bigger, and let's debug the thing! Place a breakpoint by clicking in the left gutter - your IDE should now look something like this:
Okay, you're ready to start your first debugging session. As soon as you have placed the breakpoint, you can just run your application like you normally would - from the menu, the toolbar or by pressing F5. What happens now is that the application is executed just like normal, but as soon as a line with a breakpoint is reached, the execution is stopped right before that line would be executed. In this case, it means that the variables a, b and c will have a value, but d will only have it's default value (which is 0 for an integer), since it won't be set before the line with the breakpoint has been evaluated. Now, here comes the cool part - try hovering your mouse over the different variables - the IDE will tell you what they contain. As mentioned, the d variable will have it's default value, but let's change that, by moving forward in the execution. In the next chapter, I will show you how to navigate around your code, while it's being executed.


